Mudroom Makeover- A New Bench
The work on the mudroom makeover continues with the installation of a new bench. It was all done in five easy time consuming steps.
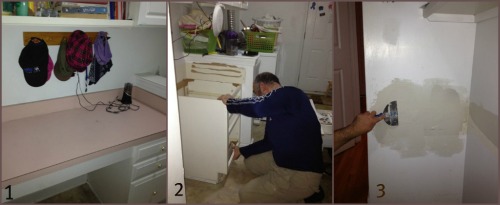
Step one: Out with the useless desk
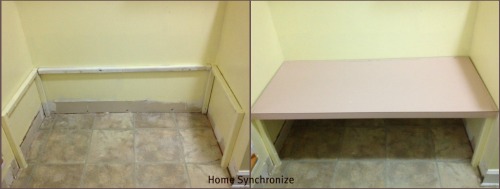
It was not too difficult to remove the old desk, especially that I was not the one who did it. Lol! Seriously, according to my husband, that was the easy part. The desktop was in great condition so we decided to reuse it as the bench top. However, the tile underneath was damaged so we replaced them. The drywall also needed to be fixed before I could paint it. My husband used Spackle, then sanded and primed (is that a word!) the wall to prepare it for painting. Finally, there was no baseboard behind the old desk and we still need to install that.
Step Two: In with the bench
The bench should be 18” high, so my husband cut a 1” x 1” wooden post into 4 legs (16” high) and a frame. Then he attached them to the wall using wood screws into the joints (studs). Finally, he placed the old desktop (2″ thick) over the legs, and voila, a new bench. Next, the seat cushion.
Step 3: Selecting fabric
I went to Jo Ann Fabrics and looked for a multicolored, durable upholstery fabric. The color scheme for the mudroom is yellow and green, so the colors in the fabric should coordinate with that. I chose a floral fabric with dark colors that will hide dirt and add to its durability. This fun pattern will add color to the mudroom and create an inviting and relaxed atmosphere. Exactly what I am looking for 
Step 4: How much fabric to buy?
The bench size is 49” x 21”. I will need to add 4” foam for comfort, so this should be included in my calculations for the amount of fabric needed.
Fabrics come in a variety of widths, the fabric I chose is 54” wide (which means that I am going to end up with excess fabric since the bench width is 49” wide). Next, I have to figure out the length which is basically the amount of fabric required for the project. Since I do not have much experience in this, I asked the saleslady for help. She applied a math formula that she uses to figure out the amount of fabric required.
49″ (width of bench) + 8 ( thickness of foam x 2) + 6= 63” (she did not know why she needs to add 6)!
1 yard =36” so 63” =1.75 yards of a 54” wide fabric and that is how much fabric I need for the bench. I will have 19” excess fabric for toss pillows.
Step 5: Making the bench Seat
Supplies:
- Plywood cut to fit bench size.
- 4” thick foam cut to bench size
- Quilt Batting
- Fabric
- Staple Gun
- Wood Glue
Process:
- Lay the plywood and glue the foam onto it.
- Wrap with batting and staple it in place
- Lay the fabric on the floor, pattern facing down, and place the plywood/Foam on top (plywood facing up).
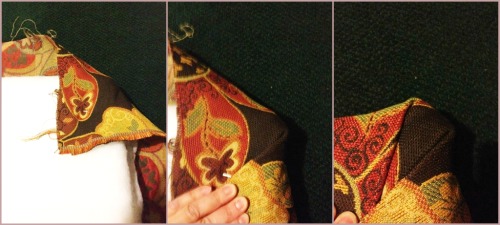
- Start with the corners , fold and staple them in place.
- A picture is worth a thousand words so the next picture explains how to make a clean corner.
- Finally, fold over and staple the remaining fabric. (I apologize for the quality of the pictures as I worked on the bench at night)
Ta daaaa! The bench is done!. 
Well, not completely! I am not liking the pink underside of the bench. I will need to remove that and paint it brown…sometime soon!
P.S. I am anxiously awaiting the toss pillows for the seat which are still with the seamstress. This is one time where I wish I knew how to sew!!
Next, the installation of the new sink and tile backsplash.
Until Next Time~


