Stencil Design Art!
I want to introduce you to the new and amazing craze in home décor, at least “new” in my book, stenciling!! This is a form of decorative painting where you paint a pre-cut image onto a surface. It is a great way to personalize your home and enhance your décor.
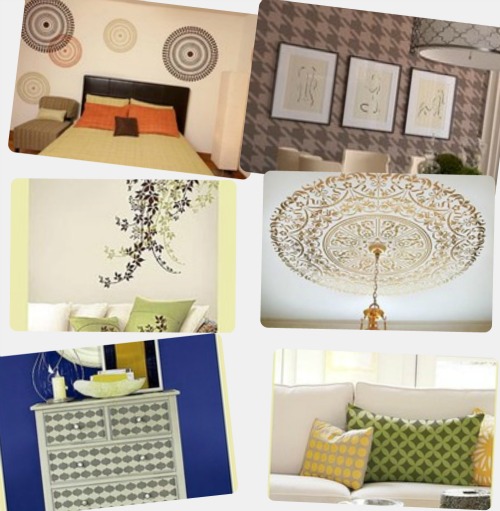
I have used stencils in the past to create borders on walls, and to decorate ceramic plant pots. However, these days I have seen them being used to create accent walls, or even whole rooms. They are also being used on fabrics, furniture, ceilings and even on floors! Cutting Edge Stencils is loaded with information and inspirations to get your creative juice flowing. Below are some examples from their website that you can create with stencils.
Oh yes, I am sooooo inspired now!  I really want to stencil an accent wall in my home! But before I tackle that “difficult” project, I need to practice on a small scale project in order to get a feel for stenciling a repeated pattern.
My dining room can use a couple of framed art pieces, so I chose to create my own through stencils.
I bought my stencil supplies from Michaels craft store. I used a pre-cut stencil design, Acrylic paint, stencil brush, stencil roller, stencil adhesive spray and two open frames. There are a good variety of stencil designs in the marketplace but if there is a specific pattern or design that you like, you can copy it and create a stencil out of it. All Things Thrifty gives a great tutorial on how to make your own stencil design.
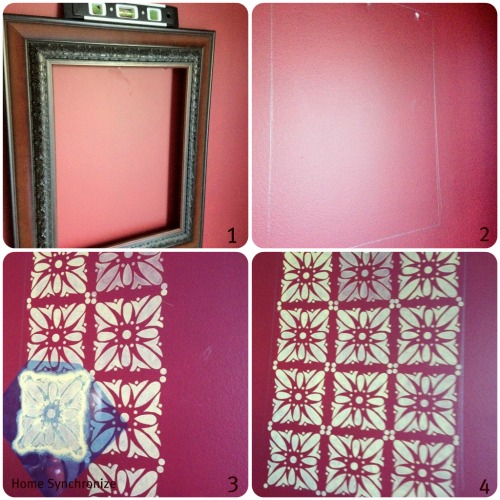
The wall had pre-drilled holes for hanging art, so I decided to use them to hang my frames. I followed the steps in this tutorial from Cutting Edge Stencils. I used the level tool to check that the frame was balanced. Then, I traced the inside of the frame with a pencil to create a boundary for my pattern. Next, I sprayed the back of the stencil with the stencil adhesive to attach it to the wall. This secures the stencil design firmly to the wall, which ensures a clean design. Finally, I was ready to stencil my design on the wall.
I had a really hard time keeping my stencil design balanced. I should have used the clip on stencil level which would have ensured the balance of my pattern. I thought I could “eye”it! That was my challenge throughout this experience. So, I am going to invest in one for my next project. Now you understand why I decided to start small! 
Anyway, here is the complete picture. (BTW, I later darkened that middle top square)
It took me one hour to create a unique piece of art that adds character to my dining room. What do you think?
Stenciling allows you to Bring out the artist in yourself! It is a very rewarding experience. Trust me!
I am excited to Link this post to….
Funky Junk Interiors: http://funkyjunkinteriors.blogspot.com/


